
 Back to homepage

 Sales & Marketing
 Mobile App Development: A comprehensive guide to developing mobile apps
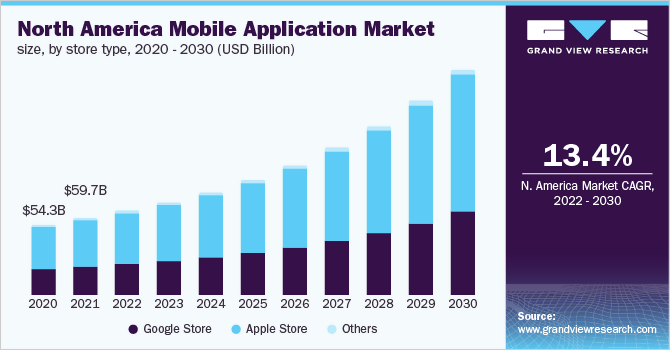
In 2023, the global app market is expected to reach $935 billion. This figure is up from $581 billion in 2019, and it’s only going to continue to grow. With this increase in the market comes an increase in the demand for apps. But what does it take to develop a mobile app? In this guide, we’ll explore the process of developing an app, from start to finish.


Table of content
Table of Contents
In 2023, the global app market is expected to reach $935 billion. This figure is up from $581 billion in 2019, and it’s only going to continue to grow. With this increase in the market comes an increase in the demand for apps. But what does it take to develop a mobile app? In this guide, we’ll explore the process of developing an app, from start to finish.
The facts are clear: mobile app development is where it’s at. After all, your competitors probably are. On average, it costs between 100,000$ and 500,000$ to develop, manufacture, and release an app. Despite the fact that most mobile apps fail, it’s not a minor operation by any means. It’s critical to determine your strategy, approach, and execution before committing time, money, and resources to developing a mobile app.
Global app downloads climbed to 194 billion in 2018, according to the State of Mobile 2019 report by App Annie. In fact, a company leveraging mobile capabilities enjoyed a 360% higher IPO valuation in 2018 as a result of consumer spending of $101 billion on app stores.
Mobile app development strategy
In the early days of mobile app development, the primary focus was on creating an app that was functional and easy to use. But as the app market has become more crowded, it’s no longer enough to just have a good app. You also need a good mobile app strategy.
A mobile app strategy is a plan for how you’re going to develop, market, and monetize your app. It’s important to have a mobile app strategy before you start development, because it will help you focus your efforts and make sure your app is successful.
It is critical to have a well-designed, researched, and implemented strategy at every level of development if you want your app to succeed. In particular, apps that are entering a new or emerging niche/industry have a tendency to fail because of poor strategy choices. So how to start?
Introduction to design thinking
Design thinking is a human-centered thinking process that allows people to identify opportunities, discover novel solutions, and create new products and services. It’s a structured approach to creative problem solving, which means it’s designed to help you find solutions to complex problems.
It was first used in industrial design to come up with new product ideas, but it has since been adopted in a variety of industries. Today, people use design thinking to come up with solutions for complex problems across business disciplines, including product development, marketing, sales, and HR.
Design thinking (product design) has been applied to various industries for decades now, but it hasn’t yet become as popular in the business world as it could be. The design thinking process has yet to fully permeate the design and business communities to the extent that it could.
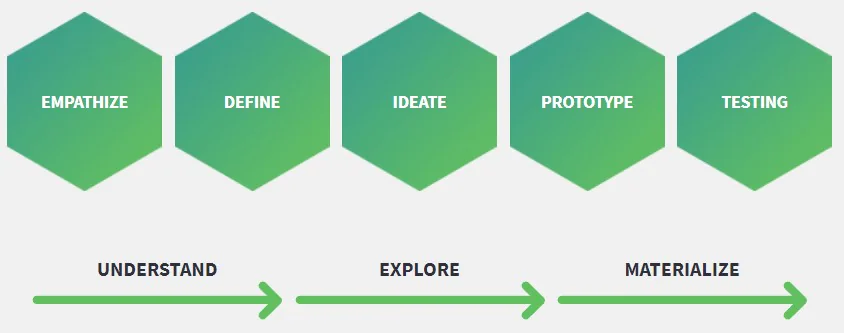
The five steps of the design thinking process
There are five steps to the design thinking process: define, empathize, ideate, prototype, and test. Each step of the design thinking process plays a role in coming up with the best solution to a business problem. To understand how design thinking works, let’s look at an example of how to use it to solve a business problem.
Let’s say you’re working at an online marketing firm and you want to come up with new ways to grow your business. You could use design thinking to come up with solutions to grow your business. The first step is to define the problem you want to solve. You could say -“We want to attract more clients for our firm.”
Once you’ve defined the problem, you’ll need to empathize with your client and understand their needs, pain points, and desires. Next, you’d ideate and come up with as many ideas as possible for how to grow your business. Once you’ve ideated, you’ll need to prototype each idea and test your ideas to find the best growth strategy for your business.
How to apply design thinking to mobile app development
Design thinking or product design is a problem-solving approach that starts with the user. It’s a process that helps you understand the user’s needs and develop solutions that meet them. This approach can be used in many different fields, including mobile app development.
Define the problem
The first step of any design thinking process is to define the problem. You need to clearly identify the problem you’re trying to solve, so you know what to design. The problem you define will impact every other step of this process, so it’s important to get it right. A good way to start is by asking yourself why you’re building the app in the first place. Why does this app exist? What problem does it solve?
Ideate solutions
Now that you’ve defined the problem and the user’s needs, it’s time to start ideating solutions. This is where you explore lots of different solutions. When you start brainstorming, don’t censor yourself. Let the ideas flow and don’t judge them as they come. The best way to start ideating solutions is to get a team together that includes everyone who will be involved in the app’s development, such as designers and developers.
This way, everyone is on the same page and can contribute. Ideate all the solutions you can think of and don’t limit yourself. Try everything and don’t be afraid to go off the rails. You can always correct yourself later.
Test and implement solutions
Once you’ve ideated all your solutions, you have to test them and see if they work. Test your solutions to see if they solve the problem you identified. If the problem is that the user doesn’t know how to use your app, how will you know if your solution works?
Do this by creating a user test. Create a prototype of your app and have a few people test it. Ask them to try to complete a given task. What are they struggling with? How can you solve their problems? You can also test your solutions with an advisory board. You can create an advisory board by reaching out to your team members and other people in your industry. Ask them to give you honest feedback on your solutions. You might be surprised by what you learn.
Evaluate results
Now that you’ve implemented your solutions, you have to evaluate the results. Did the solutions you implemented solve the problem? Did you solve the right problem? Is there still something missing? The best way to do this is to get feedback from your team, but also your users.
You want to make sure that every person who uses your app is successful. Once you’ve collected feedback, you can go back to your original problem and make sure that your solutions solve that problem. If they don’t, you can go back to the ideation phase and try again.
Designing mobile apps with design thinking is a great approach. Design thinking forces you to truly grasp your users in order to create a better mobile app. Knowing what your users want, how they interact with your app, and how you can enhance that will help you plan your app’s development right from the beginning.
If you apply design thinking to your app, you will have a better chance of success. Your users will find your app more usable, more fun, and more engaging as a result. You’ll be glad you put in the time once you see the result.
Watch the product discovery (design thinking) workshop in practice
Bad design = bad business
Mobile app design is an iterative process, meaning you’ll likely have to go through several rounds of design, testing, and redesign before you get a finished product. You don’t want to get locked into an idea too early, or you risk wasting time and money on something that doesn’t work.
The first step towards designing a mobile app is to get a clear understanding of your users. Who are they? What do they want? What problems do they have? Once you have a clear idea of your target audience, you can start to brainstorm ideas for your mobile app development.
Keep your user interface simple
The first and most important guideline for designing a UI that you won’t hate is to keep it simple. The user interface, or UI, is the part of your app that people will see and interact with. The goal of the UI is to provide an intuitive experience that helps the user achieve their goals. When designing your app, you want to keep your UI simple. Too many buttons, too many options, and too much information will confuse and frustrate your users.
Here are a few tips for keeping your interface simple:
- Limit the number of screens – Mobile users appreciate apps that give them quick access to their most important features. They don’t want to go digging through a bunch of screens to get what they’re after. Think carefully about which features go on which screens, and keep your app as streamlined as possible.
- Use visual cues – Visually orient your users by including visual cues, such as arrows and tap bars, to show them how to navigate your app. This will help prevent user frustration and get people to their desired destination faster.
- Keep your text concise – You don’t want to overwhelm your users with text, and the same goes for your visuals. Use bulleted lists, concise sentences, and visuals that can be interpreted at a glance. This will help keep your app easy to understand, even for people who don’t regularly use apps.
Make It Easy to Use
The second guideline for designing a UI that you won’t hate is to make it easy to use. This means that it should be straightforward, with no hidden features or functionality. It should be obvious what each feature does and how to use it.
A straightforward UI will make it easy for your users to achieve their goals, so they’ll be satisfied with your product. It will also make it easier for you to improve your product in the future. If you ever need to add new features, it will be easier to figure out where to insert them if the rest of the UI is straightforward.
Make It Intuitive
The third guideline for designing a UI that you won’t hate is to make it intuitive. This means that it should appear to be obvious, even though it is actually straightforward. A good example of intuitive UI design is the play button for a music app. To someone who has never used the app before, it probably doesn’t seem obvious what the play button does.
But once you use the app, you intuitively understand that the play button starts the music. A great UI will help users achieve their goals with minimal effort. It will feel natural to use it, even if you’ve never used it before. If a UI is intuitive, it will be easier for new users to learn to use it. It will also make it easier to improve your product in the future.
Make It Consistent
The fourth guideline for designing a UI that you won’t hate is to make it consistent. This means that all features and elements of the UI must follow a consistent design scheme that is clearly visible.
The design scheme doesn’t have to be strict, but it must exist and be obvious. Let’s say that you want to make some elements of the UI blue and some elements orange. You could do it, but it needs to be consistent. A consistent UI will make it easier for your users to navigate and understand your product.
Consistency will also make it easier for you to improve your product in the future. If you ever need to add new features, it will be easier to find a place to insert them if everything is consistent.
Allow for Flexibility
The last guideline for designing a UI that you won’t hate is to allow for flexibility. This means that it should be easy to change and adjust. For example, if you’re designing a UI with a color wheel, you should make it easy to change the colors.
If you’re designing a UI for a website, you should make it easy to edit and rearrange elements. A flexible UI will make it easier to adapt to changes in your product and your environment. It will also make it easier to improve your product in the future. If you ever need to change a feature, it will be easier to do it if the UI is flexible.
Make sure your app is responsive
The design of your app doesn’t end with the interface. You also have to consider the design of your app’s backend. This includes the technology that powers your app, as well as the way your app’s data is stored. If your app is not responsive, it will break.
A non-responsive app is one of the biggest issues in mobile app design and will seriously impact your users’ experience. Here are a few tips for making sure your app is responsive:
- Test your app on different devices – You want to make sure your app looks good and functions properly on all devices. You’re not only designing for one device, so you want to test your app on as many devices as possible.
- Enable universal auto-resizing – You may want to consider enabling universal auto-resizing in your app’s design so that your app automatically adjusts to fit different screen sizes. This will help ensure your app still looks good, even when you use it on a device with a different screen size.
- Include large font sizes – You’ll also want to make sure you include large font sizes in your app’s design so that it’s readable on all devices. You don’t want to make it impossible for your app to be usable just because it was designed for one device.
An example of a simple interface of our implementation – watch the case study!
Use the right tools
Designing a great UI/UX is essential if you want your product to be successful. But with so many different tools available, it can be hard to know where to start. We have compiled a list of the best tools in our opinion to work with while working on UI/UX:
Sketch
Many UI/UX designers prefer Sketch over Photoshop because of its user interface and user experience design focus. The drag-and-drop design procedure in Sketch is very simple because of its WYSIWYG (what you see is what you get) interface.
Sketch is a great collaborative tool as well. Collaboration capabilities allow you to distribute assets to other designers as soon as you’ve finished designing them. It’s available for Mac, Windows, and even Linux. It’s not the cheapest option, but Sketch has thousands of plugins.
Adobe XD
Adobe has recently released a software application known as Adobe XD. It’s one of the most effective instruments for designing cross-platform apps for both mobile and web platforms. Its user interface is similar to Photoshop, making it simpler for Photoshop users to adopt it.
Collaboration abilities are present in many other design tools, and Adobe XD is no exception. The ability to share assets and work on group projects is simple with Adobe XD.
InVision
InVision is the best option if you want to build interactive prototypes. You can create clickable prototypes, include user flows, and even design microinteractions with it. Working with a team and clients is much easier when utilising InVision.
Team members may leave comments on projects, for example. You can also invite clients to join project rooms and view and comment on designs. It has collaboration features, such as allowing team members to leave comments. The downside is that it is more expensive than other tools and doesn’t have as many design options.
Marvel
Marvel is an excellent tool for brainstorming and ideation sketches. You can use it to create storyboards, app flows, and even website wireframes. Collaborate with your team members and clients on your designs with Marvel’s collaboration tools.
Using Marvel, you can create storyboards, app flows, and even website wireframes. Some users report bugs, but collaboration features, ideation tools, and sketching tools are all beneficial, in addition to collaboration features.
Figma
Figma was created to assist designers in creating high-resolution prototypes. It is one of the most widely used design tools in the world. Figma’s UI is simple and user-friendly. With Figma, you can drag and drop objects, resize photographs, and organise your projects.
You may also create teams and invite other designers to collaborate on your projects. If you prefer to utilise keyboard shortcuts rather than a UI menu, Figma supports them. Its app browser allows you to insert screenshots into your designs.
It also enables you to create high-quality mockups. Collaboration features, keyboard shortcuts, and built-in app browsers are available. However, it is more pricey than other software.
Balsamiq
Balsamiq is an easy-to-use wireframe and flowchart tool. This tool makes it simple to create low-fidelity mockups (in comparison to Figma, which produces higher-fidelity mockups). Balsamiq’s interface is simple to use. It is simple to create low-fidelity mockups and wireframes with this tool.
In addition to being simple, Balsamiq is also an excellent tool for creating simple flowcharts. It is also available on Mac and has a web app. Working with team members and clients on your design is simpler with Balsamiq. Collaboration features, simple interfaces, and low-fidelity mockups are all advantages. Although it does not offer as many design choices or features as other tools, Balsamiq is a good collaboration tool.
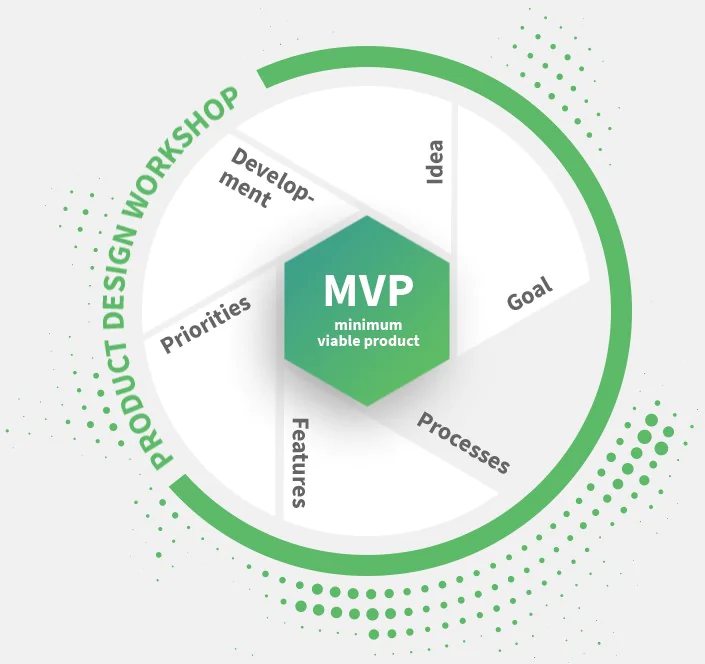
MVP or not to MVP – most important question
Mobile app development can be a daunting task. There are so many things to consider, from the design to the functionality to the user experience. And if you’re working on a tight budget, it can be tempting to cut corners in order to get your app to market quickly.
But beware! A rushed, poorly executed app can do more harm than good. So, what’s the best way to build a mobile app on a tight budget? The answer is to focus on creating a minimum viable product, or MVP.
What is an MVP?
An MVP is the minimum viable product of your app, which essentially means the barebones version of your app. An MVP is essentially a prototype of your app that has a very limited feature set.
That way, you can easily implement feedback from potential customers and identify holes in your app. An MVP focuses on core functionality. Creating an MVP allows you to quickly release your app to the market, especially when you’re working on a tight budget. What’s more, an MVP can help you reduce costs because you won’t have to include all the bells and whistles in your app.
The benefits of creating an MVP
- Reduce risk – Building an MVP can help you reduce your risk. With an MVP, you can get your app to market quickly, allowing you to generate revenue—and recoup some of your investment. This can be especially helpful if you’re working with a tight budget.
- Focus on core functionality – With an MVP, you can focus on building your app’s core functionality. If your budget is limited, you may not have the funds to create every feature in your app. An MVP helps you decide which features are most important to your app and enables you to focus on implementing and perfecting those features.
- Get feedback from potential customers – With an MVP, you can quickly get your app in front of potential customers for thorough testing. This allows you to get feedback on what’s working and what’s not. With this information, you can make adjustments to your app before releasing it to the public.
- Identify holes in your app – With an MVP, you can identify any holes in your app before releasing them to the public. Your app is not complete, so it’s important to test it with potential customers to see what’s missing and what needs improvement.
How to create an MVP
– Identify your target market – Second, you need to identify your target market. Who are you building your app for? What are their needs, and how can you meet them? Once you’ve identified your target market, you can create functionality that addresses their needs.
– Create a prototype of your app – Next, create a prototype of your app. You can do this with a wireframe or sketch. A prototype is a visual representation of your app. It allows you to visualize your app and identify any holes in your functionality.
– Test your prototype with potential users – Finally, test your prototype with potential users. This will help you identify any holes in your app and get feedback on what needs to be improved or added. Once you’ve tested your prototype, you’ll have a better understanding of the holes in your app and the features that need to be added.

Agile Project Management
Organizations use agile project management to get projects done quickly and efficiently. It’s a popular approach for software development, but it can be used for any type of project.
Agile project management is based on the Agile Manifesto, which is a set of principles for software development. The manifesto is based on four values: individuals and interactions over processes and tools, working software over comprehensive documentation, customer collaboration over contract negotiation, and responding to change over following a plan. The agile approach is based on these values, and it emphasizes collaboration, flexibility, and customer satisfaction.
What Is Agile Project Management?
Agile project management is a flexible, collaborative approach to project management. It was created specifically for software development, but it can be used for any type of project. In an agile project, you’ll have a specific project goal or objective and a project plan.
The difference between a traditional project plan and an agile project plan is that the agile one is flexible. The plan may change as the project progresses, and the team is expected to be able to adapt quickly to these changes.
Agile emphasizes teamwork, collaboration, self-organization, and an expectation of change. It’s appropriate for projects with a high level of uncertainty. It also stresses early feedback and continuous improvement.
The agile project management process in mobile app development
Let’s take a look at the steps of the agile project management process. It’s important to remember that this process is a guide and not a set of rules that must be followed exactly.
You may find that your team likes to follow this process closely, or you may decide to adapt it for your organization. The agile project management process is all about collaboration, flexibility, and customer satisfaction.
It begins with the project initiation phase, where you’ll create the project vision, goals, and objectives and create a project charter. Next, you’ll create a project plan, including the scope, timeline, and budget. Then, you’ll execute the project, tracking your progress as you go. You’ll monitor your project and make adjustments as needed. Finally, you’ll end the project with a closeout, including lessons learned and the project closure.
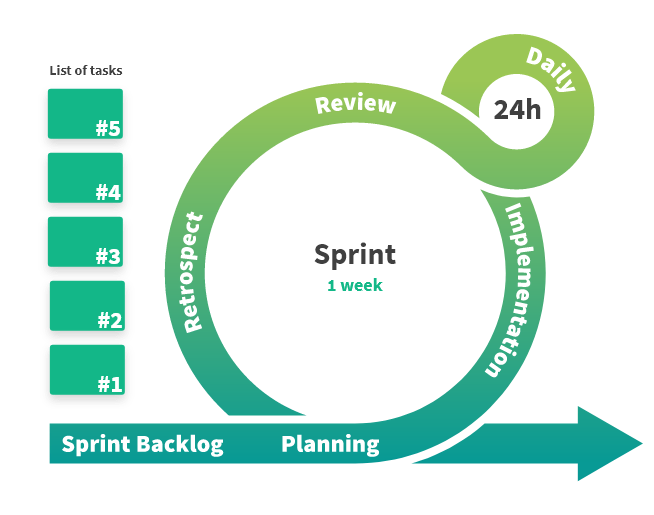
Planning
The first step in any project is planning. Planning is what allows your team to be successful and get the desired results. Planning is the process of creating a plan and then executing against that plan to create the desired outcome.
The goal of planning is to create a step-by-step path to success. In agile project management, planning is an ongoing process. It’s important that you view planning as a continuous activity and not as a single event.
Planning with your team allows you to create a shared understanding of what the project is and what needs to be done. It also helps you create a path to success so that you know what each team member has to do to complete the project successfully. Planning for your project doesn’t mean creating a detailed plan that is followed exactly. It means creating a general plan that allows you to work together to find the best solution.
Execution
Execution is the actual work that is done as part of a project. It’s the part of the project management process where the project team members follow their plan to create the desired outcome.
During execution, the project manager will be responsible for monitoring the team’s progress and making sure that they remain on track. If you notice that a team member is struggling, you’ll want to intervene and help that team member complete their work. In agile project management, this work is done in an iterative way.
This means that you’ll work in smaller chunks that are completed and then assessed. This allows you to work quickly, get feedback, and course correct if necessary.
Tracking and Monitoring
As the project manager, you’ll be responsible for tracking and monitoring your project. Tracking is the process of keeping tabs on the project by recording what has been done and what needs to be done next.
Monitoring is the process of checking in with your team members to see how they’re progressing and if they need any help completing their work. It’s important to track and monitor your project so that you can see where there are issues and how close the team is to completing the project successfully.
This can help you identify problems early so that you can resolve them before they become big issues. It gives you data that you can use to make adjustments to the project and make sure that the project stays on track.
Reporting and Communicating
Communication is an important part of every project. It’s important to keep your team members informed about the project and what needs to be completed. It’s also important to have frequent one-on-one meetings with your team members to see how they’re progressing.
This allows you to check in with your team members and make sure they have everything they need to complete their work. It also gives you an opportunity to intervene if you see that there is a problem or that a team member needs help.
Reporting on the project allows you to communicate with your stakeholders about the project and make sure they are aware of the status and any issues that may arise. It also allows you to track your progress and helps you understand how far you are along in the project.
Project Management Tools
Project management software is a must for any project, big or small. If you’re leading a team and need to manage your work and resources efficiently, project management software can help you keep track of tasks, resources, and deadlines. Those who lead projects on a regular basis–or even those who just get stuck in the weeds from time to time–will find these tools especially helpful.
Smartsheet
If you need a simple solution for tracking progress and managing projects, Smartsheet is one of the best options. It has a simple interface, but it also packs in a ton of useful features that make it especially useful for project management.
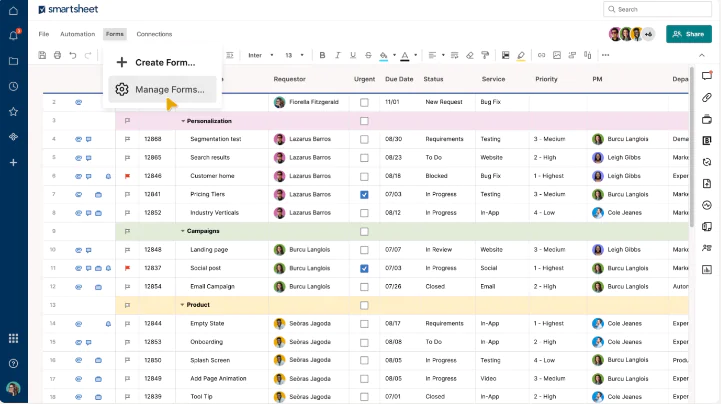
You can use Smartsheet to build a work flow where people can track their status and see what others are doing as well. It’s useful for things like team status reports, and it can also be a useful tool for managing a project timeline with multiple milestones.
You can easily add tasks to a project and add due dates, attach files, set priorities, and even integrate with your calendar to see everything in one place. You can’t share your projects with external stakeholders unless you pay for a premium account, but you can use Smartsheet for free if you only have a few projects going at a time.
Trello
Trello is mostly used for smaller, less serious projects. It’s great for organizing stuff—especially if that stuff is visual. Trello lets you create boards where you can post tasks, notes, and more. Trello’s biggest strength is that it’s visually appealing. You can add visuals to your boards and use them to track progress. It’s simple and easy to use, which makes it a great option for smaller teams. Trello doesn’t offer a lot of advanced project management features.

You can’t create milestones, assign tasks to people, or track hours. It’s not a good solution for serious projects or large teams. Still, if you are looking for a simple solution for organizing a small team, Trello is a good solution.
Slack
Slack is primarily used as a communication tool, but many teams have found ways to use it as a project management tool as well. For example, you can create channels for each of your projects and then use those channels to track tasks and communicate with the team. This solution is ideal for very small teams or groups that don’t need a lot of organization.
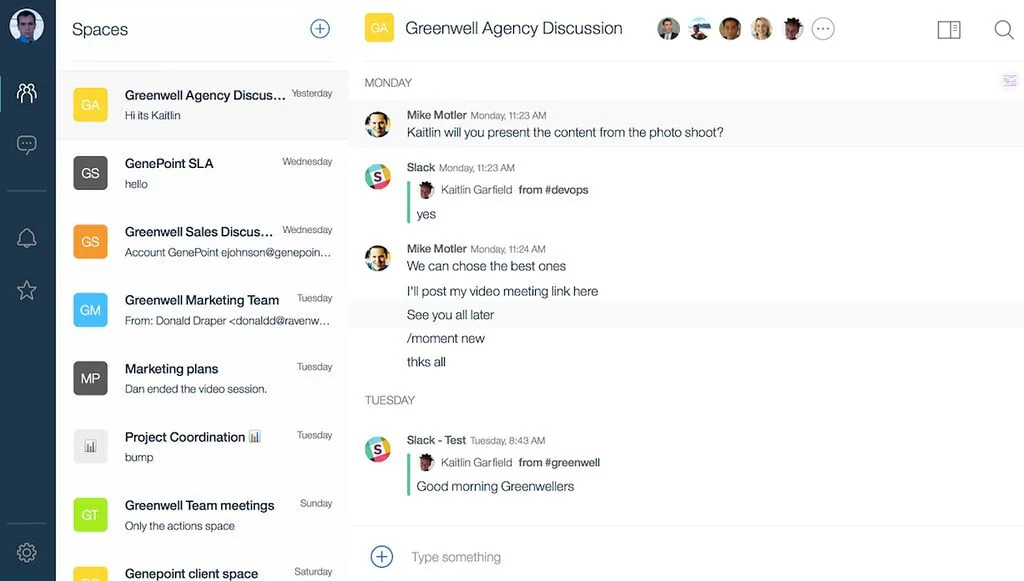
It’s not ideal for managing complex projects or tracking hours. You can use Slack to create projects, assign tasks to team members, and keep track of the overall status of each project. You can also add attachments to tasks, create due dates, and even add progress bars to each task to visually track progress. Slack can be useful for communication, but it isn’t a robust project management solution.
It doesn’t offer any features for managing team members, budgets, or other aspects of project management. You can use Slack to manage smaller projects, but you’ll need another tool if you have larger projects with more complex timelines.
Google Docs and Google Calendar
If you need a simple solution that doesn’t require downloading or installing any software, Google Docs and Google Calendar are free options that can help you manage projects. Google Docs and Google Calendar have most of the same features that you’ll find in other project management solutions. You can create calendars, assign tasks, assign due dates, and even add people to your calendars.
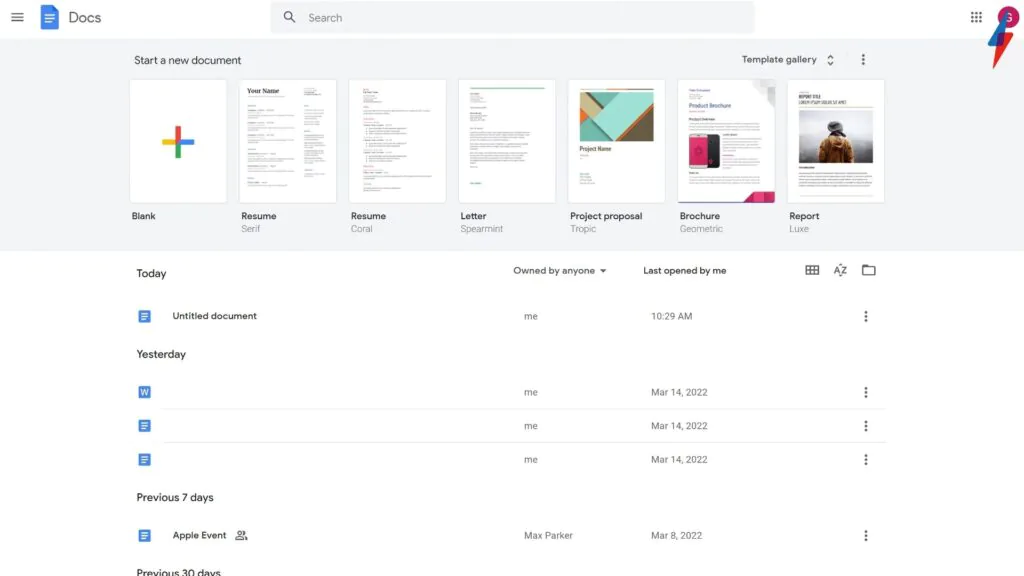
From an overall design standpoint, Google Docs and Google Calendar aren’t as visually appealing as some of the other options on this list. They don’t have nice graphs or charts that make it easy to see project timelines and other data visually. However, they are free and can help manage smaller projects. If you’re looking for a simple solution that doesn’t require installing any software, Google Docs and Google Calendar are viable options.
Jira
Companies of all sizes use Jira, a simple project management tool, to track progress, manage team members and create deadlines. Jira is a popular project management tool because it has a large online community. This means you can find resources and guides online that can help you get the most out of the software.
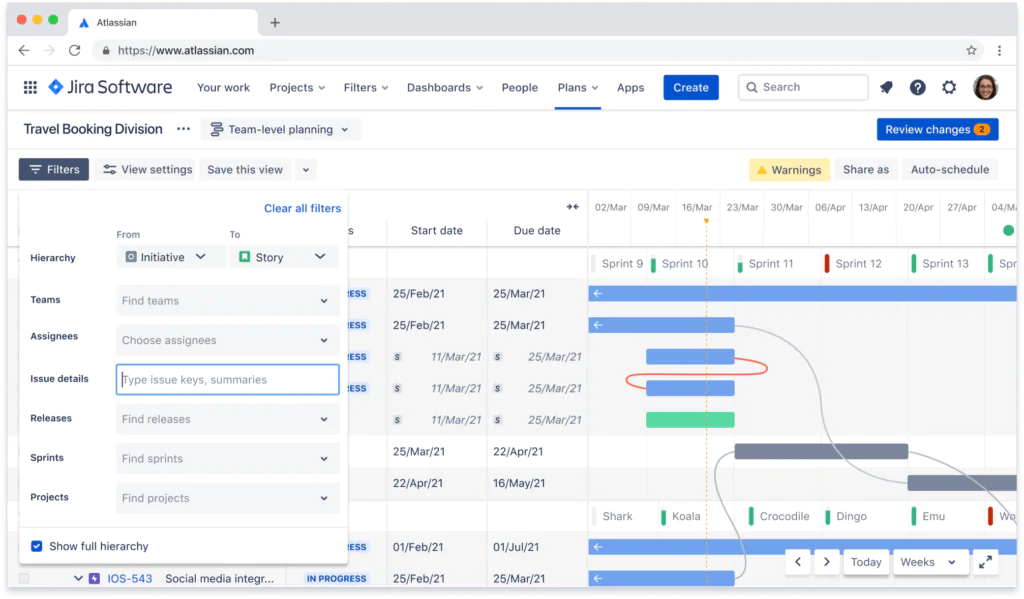
Jira has a wide variety of plans so you can find one that fits the needs of your team. Jira’s interface is very straightforward. You can see task details, due dates and statuses in one simple view. This makes it easy to stay on top of everything that needs to be done. You can also create custom boards for different projects. Jira also allows you to create checklists for tasks and add who’s responsible for the work.
Miro.com
It’s crucial for groups to be able to collaborate and communicate well as more work is being done remotely. Collaborative, task management, communication, and other software tools can make this simple. We include Miro on our design thinking software guide in this post.
This digital ‘whiteboard’ enables you to brainstorm and collaborate with colleagues throughout your team or innovation initiative. This post provides a brief description of this tool and describes how you can use it in your own workflow processes.
What is miro?
Miro (formerly known as RealtimeBoard) advertises itself as a digital whiteboard that makes collaborating simple. With Miro, you can create notes and designs, rearrange things, and communicate via video calls or online chat sessions.
You can also use the tool’s pre-designed templates as an inspiration or foundation for your own project work. Using Miro as part of a real-time remote design thinking workshop is one of our favourite things to do during mobile app development.
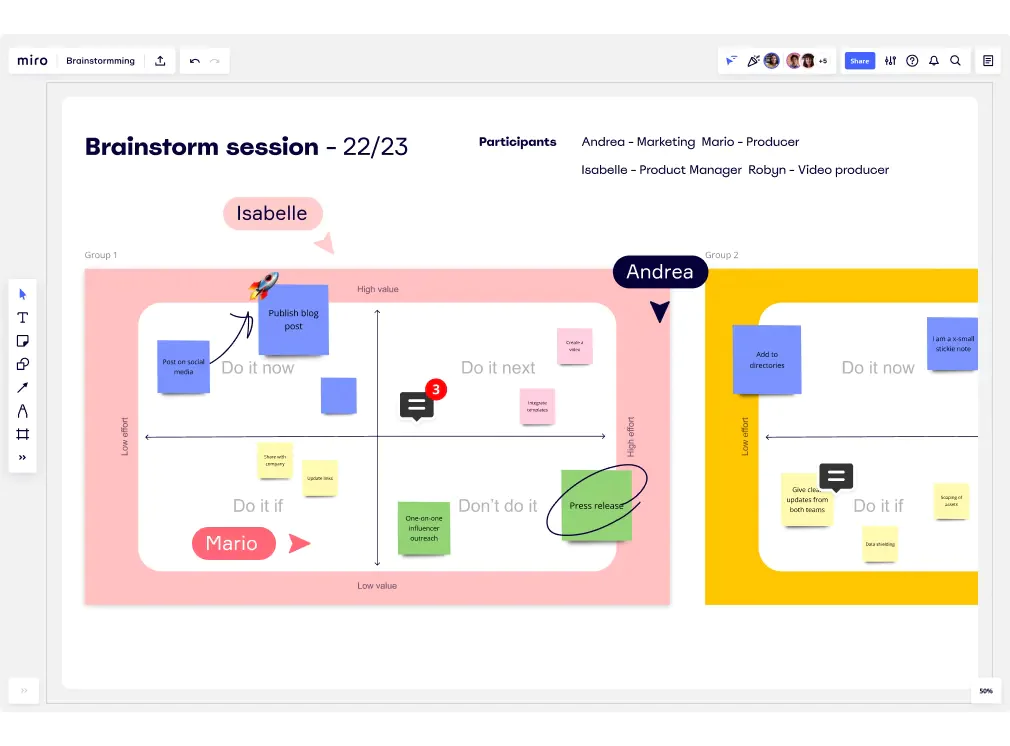
Prior to developing an important product, you can focus on developing a user story or customer journey map, or creating a list of ideas or topics. You can also lay out a roadmap or strategy for an innovation workshop or program, run a more engaging or innovative meeting for your team in an agile culture, or develop a new product concept or idea.
This is how we use miro during design thinkig workops
Mobile app development: Technology Stack
The connection between a great idea and a successful mobile app might be the app technology stack you choose. We will explain the different kinds of mobile stacks and how you can pick the right one for your app.
What Is Mobile Development Stack
A mobile development stack or mobile stack refers to the set of platforms, frameworks, tools, UX/UI software, and other technologies required to build a working mobile app.
The mobile app development stack is made up of these components:
- The frontend is made up of technologies that are used to build the interface that connects with users.
- The back-end includes solutions and programs necessary to build the server’s processing logic. The development environment offers libraries and interfaces needed to build the app. It also offers supporting features such as security, flexibility, and performance.
Native Apps
First, let’s take a look at native apps. Native apps are built using the programming language of the specific platform they’re built for. For example, if you want to build an iOS app, you’d build a native app using Swift or Objective-C.
On Android, you’d build a native app using Java. This is the best way to build a mobile app if you want it to perform well. A native app runs directly on the device and has full access to its features and hardware.
This makes it really fast and responsive because it doesn’t have to rely on a web app or web service to work. That’s why many popular apps, such as Instagram, Facebook Messenger, and Uber, build as native apps.
Hybrid Apps
Next, let’s look at hybrid apps. A hybrid app is a app which uses a combination of native and web technologies. Usually, developers build a hybrid app with a cross-platform framework, such as Apache Cordova, Ionic, or Xamarin.
These frameworks let you build an app using web technologies, such as HTML, CSS, and JavaScript, and then package it as a native app for different platforms. Hybrid apps are a good option if you don’t have the budget or expertise to build a fully native app.
They’re also ideal if you’re building a simple app that doesn’t need access to the device’s hardware or sensors. Hybrid apps are also great if you want to quickly build and launch an app without having to wait for app store approvals.
Progressive Web Apps
A Progressive Web App, also known as a Web App 2.0, is a website that uses modern web technology to provide an app-like experience.
Progressive Web Apps work like regular websites but you can install them on your device and use them offline.This means that people can use your app even when they’re offline, such as on the train or plane. In order to build a Progressive Web App, you need to use modern web technologies such as Service Workers, Web App Manifests, and Web Delayed Loading.
If you’re building a website, you can boost its performance and functionality to make it work like an app. Progressive Web Apps are becoming more and more popular as people are growing more reliant on the web for everything from information to entertainment. They are also great for e-commerce websites as they allow people to make purchases even when they’re offline.
React Native
Instead of using web technology to construct an app, React Native uses JavaScript and React (a UI library). React Native is a technology that allows you to build native apps using JavaScript and React. React Native is popular among developers because it allows them to create apps using JavaScript and React, which many developers are already familiar with.
Because you can build apps more quickly and at a lower cost with React Native, it’s well-suited for apps that require dynamic user interfaces. It may be more difficult to create apps with React Native if they rely heavily on graphics and photo editing.
Flutter
Flutter is a mobile application SDK that allows developers to create apps for both Android and iOS. Framework is unique in that it uses a single source code to create apps for both Android and iOS. Once you’ve written the app code, it can be compiled and used to create apps for both Android and iOS with Flutter. Flutter uses the Dart programming language, which was developed by Google. Flutter has gained in popularity in recent years. If you want to create an app for both Android and iOS and don’t have the money to hire developers for each platform, Flutter is a great solution.
Ionic
Next, let’s take a look at Ionic. Ionic is a technology similar to React Native and Flutter. It’s a framework used to build hybrid apps using web technologies, such as HTML and CSS. Ionic’s main focus is to make it easier to build hybrid apps.
It includes pre-built components and tools to make it easier to build and deploy apps. Ionic is great for building apps that need to work across multiple platforms. It’s also really easy to use and learn, which means you can build an app faster. However, Ionic can’t be used to build apps that require heavy graphics or advanced functionality.
Software architecture: essential components that you need to implement during mobile app development
When you are designing and developing software, you need to think about a lot of things. The software is made up of modules and components that are interconnected, and every decision you take will impact the final product.
Software architecture is an organized and detailed structure that defines how your system should be built so that it’s maintainable, testable, and extendable. Good software architecture also improves the implementation of new features and reduces the cost of maintenance
Define a Roadmap for Upcoming Releases
As we mentioned earlier, software is an evolving process. Once the product is ready, it’s not finished. You will be adding new features and improving the old ones to make your product better. Once the roadmap is set, make sure that the team members are aware of the upcoming releases and their timelines. This will help them plan and prioritize their work, and it will help avoid unnecessary changes in the last minute. This will also help you track the progress of the project better.
Define Data Objects and APIs
Defining data objects and APIs is one of the most important things to do while designing software. If your application is a database-driven application, then you need to carefully define the data objects and define APIs for those objects. In short, the data objects are what you need to store the data, and APIs are what you need to retrieve the data from the database.
If your application is not a database-driven application, you will still need to define APIs. APIs are nothing but the exposed endpoints that define how other applications will access your system through the internet. It’s important to define data objects and APIs because it will help you think about coupling and cohesion. By knowing the nature of data, you can define the modules that will house that data.
Define a Standard for Code Quality and Tests
A good standard for code quality and tests is another important thing to do while designing software. A standard for code quality will ensure that all the modules in the system are well written and adhere to the code conventions. It will also help you understand which rules are mandatory and which rules are optional.
A standard for tests will ensure that your system is testable and that the team members follow a standard for writing tests. Every system should be tested to make sure it works as expected. The tests help developers identify and resolve bugs quickly, and they also help reduce the cost of maintenance by finding bugs as early as possible. If a system is not testable, then it becomes a lot more complicated to write tests for that system.
Define User Interface Standards
Last but certainly not the least, you need to define user interface standards. It’s important to define standards for the user interface because it helps you make critical decisions while designing a user interface.
If you are building an application for an enterprise company, then you need to follow the company branding guidelines. If you are building an application for consumers, you will have to make sure that the application looks and feels user-friendly.
You also have to make sure that the application is responsive so that different types of devices can access it. If you are building an application for both enterprises and consumers, then you will have to make sure that the application offers both consumer-friendly and enterprise-friendly user interface designs.

Mobile app development: how much does it really cost?
There are lots of different types of apps you could create, and the cost of development varies depending on the type of app. Other factors such as the features included in the app, the platform it’s built for, and the team of developers you hire also affect the cost of development.
The cost of mobile app development depends on the features
The features included in your app will have a big impact on the cost of development. A few years ago, it was common to see SaaS companies offering mobile app templates that you could use to quickly create an app.
Although these templates were quick and easy, they were also very basic and typically only cost a few hundred dollars to create. While these app templates were cheap, they also offered very limited features.
Today, it’s much more common to create apps that include a wide range of features. The types of features included in your app will have a significant impact on the cost of development. In particular, apps that include features such as push notifications, GPS tracking, or augmented reality are more expensive to develop than apps that don’t include these features.
The cost of mobile app development depends on the platform
The platform you want to develop your app for will have a significant impact on the cost of development.
Native apps are more expensive than hybrid apps, and hybrid apps are more expensive than web apps. The reason that native apps are more expensive than hybrid apps is because each platform requires its own building process. The reason that hybrid apps are more expensive than web apps is because they also require platform-specific building processes.
The cost of development for a specific platform can vary, depending on the features included in the app. For example, a feature-rich app aimed at the Android platform will be more expensive than a feature-rich app aimed at the iOS platform, because each app requires a separate building process.
The cost of development for a specific platform can vary depending on the team of developers you hire. For example, hiring a team of iOS developers will be more expensive than hiring a team of Android developers because of their experience in building for these platforms.
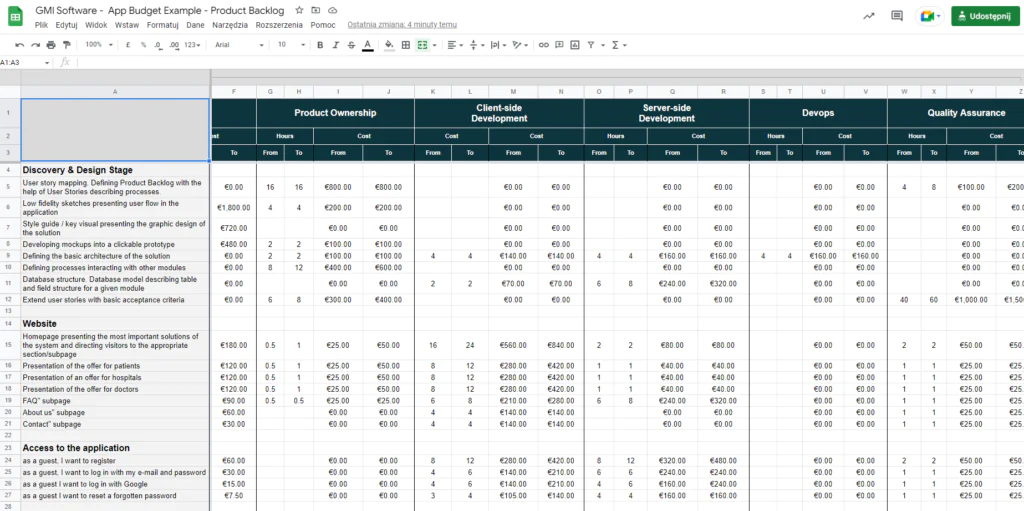
Download an example of a mobile app budget

The cost of mobile app development on the team of developers
The team of developers you hire to build your app will have a significant impact on the cost of development. You can choose to hire in-house developers, outsource to an app development company, or hire a freelancer.
In-house developers are the most expensive option, and freelancers are the least expensive option. The cost of development for a specific platform can vary, depending on the team of developers you hire. For example, hiring a team of experienced iOS developers is more expensive than hiring a team of inexperienced iOS developers.
The cost of development for a specific platform can also vary depending on the features included in the app. For example, adding real-time audio and video conferencing to a native app on the Android platform is more expensive than adding the same features to a native iOS app because the Android platform requires an additional coding language.
How to keep the cost of mobile app development down
The best way to keep the cost of development down is to break the project down into smaller stages (MVP). You can then work with the developer to create a project schedule that details the features that need to be included in each stage.
This will allow for breaking down the cost of development into smaller chunks that are easier to manage. You should also try to find a developer who is willing to negotiate the cost of development. This will help you to reduce the cost of development, as you can use these negotiations as a way to offset the cost of development.
You should also be realistic about the features that you want to include in your app. If you want to include lots of features, then the cost of development is likely to be significantly higher. It’s important to find a happy medium between the cost of development and the features included in your app.
Summary
Developing a successful app is not as difficult as people think. To translate a great idea into a successful application, you must have everything right: the right people, the right processes, and a clear development approach.
However, the road between an initial concept and an effective application is littered with hazards. You may avoid these dangers, however, if you employ the right people, procedures, and plans.